
PP3 generates celestial charts of high (typo)graphical quality. It uses LaTeX + pstricks for this, so the end formats are EPS and PDF (in contrast to mere bitmaps).
The program automatically avoids labels that overlap, and you can change many parameters. You can place arbitrary text on the map using the flexibility of the LaTeX language.
This manual exists as a multiple HTML (also in ZIP form) and single HTML page and a PDF file.
Copyright © 2003 Torsten Bronger <bronger@users.sourceforge.net>.
This documentation is free software; you can redistribute it and/or modify it under the terms of the MIT licence. Please see the COPYING file of the PP3 distribution for further information.
There are many programs that can create stellar maps. But none of them reaches PP3's typographic and graphical quality. In contrast to other programs PP3 produces vector images (e.g. PDFs) rather than mere bitmaps. Therefore it is perfectly suited for creating illustrations for books or other print media. But even converted to bitmaps for web pages, it exceeds usual quality.
PP3 is optimised for the semi-automatic generation of large sets of sky maps. It has decent default behaviour, however it can be customised very flexibly. It tries to take as much fine-tuning work away from you as possible.
But I must also point out what PP3 is not. It cannot help you to professionally prepare your next observation night, nor is PP3 a visualisation tool for astronomical databases, with pop-up window information for every sky object on the screen.
In fact, PP3 not even has a graphical user interface. So don't expect any windows at all, and your mouse will be useless. Instead, PP3 reads from one file and writes to another file. (This is done not only because its author was lazy but because it increases efficiency, too.) So, the program itself is quite stinted, but its results are worth it!
Further information about PP3 beyond this manual and downloads on the Internet:
Please login when you use one of the services on Sourceforge. It makes responding easier.
PP3 has been used in real life already and has proven its helpfulness.
PP3 has created the celestial maps of all 88 constellations on Wikipedia, the free encyclopedia. Feel free to browse through a list of all constellations.
This is a web page, so you need bitmaps1, and a short Gimp script2 helped me to convert PP3's EPS vector output to PNG bitmaps. Additionally, this script creates smaller thumbnail version for all charts that exceed a certain width.
The result is that one can create all maps plus their thumbnails with one simple command call:
make
Surely it can't become simpler. You may retort “Well, but creating the maps must have been the actual work”. Of course it was, but first it took only 10–15 minutes per map, because much work is done by the default behaviour of PP3 itself. And secondly:
Several months later the French division of Wikipedia wanted to translate the maps to French. They wanted
another background colour and French labels and constellation names.
They provided me with a translation table. It took me three hours to
adjust the scripts, to run make again, and to upload the
ZIP file with all the demanded bitmaps. See for example the
Scorpius entry.
Originally PP3 was written for a project on h2g2, an edited Internet encyclopedia. Unfortunately the BBC editors wanted very small bitmaps that would not have been helpful, and they were too lazy to include all the 88 bitmaps. So the project died, but on a smaller scale (for ten constellations or so), it indeed motivated authors to contribute articles about constellations. The maps were externally linked.
You can get the latest PP3 file releases from PP3's project page on Sourceforge. The main PP3 distribution comes as several files, namely
pp3-version-win.zip
pp3-version-1tb.i386.rpm
pp3-version-1tb.src.rpm.)
pp3-version.tar.bz2
pp3-version-cripple.tar.gz
Obviously you need only one of these files.
Although PP3 runs independently of other programs, it is not useful when it's alone. It needs two external tools in order to work properly: TeX and Ghostscript.
TeX is a mighty typesetter. PP3 calls TeX in order to actually create the stellar map. The result is a Postscript file.
There are two major TeX variants for Windows, namely MikTeX and TeX Live. Both are rather similar in their functionality, and both come with a nice installation tool. Please assure that the PSTricks package as part of TeX is installed, however this is highly probable anyway.
The best tool for dealing with Postscript files is Ghostscript. In particular, if you've installed Ghostscript, PP3 is able to generate PDF files for you. It is wise (although not necessary) to install GSView, too. It lets you view arbitrary Postscript files on screen.
When TeX and Ghostscript are in the right place, you finish the installation by unpacking the PP3 ZIP file and copying its content in the proper directories:
pp3.exe to an arbitrary directory that is in your
PATH.
PP3DATA to this directory.
For the sake of simplicity, I recommend to copy everything to
C:\Programs\pp3 and to set your PATH environment variable
to
old PATH;C:\Programs\pp3
and to set the PP3DATA environment variable to
C:\Programs\pp3. That's it.
Before you install PP3, ensure that TeX and Ghostscript are installed.
You should consider to use the RPM file, because it is the simplest installation. It works for SuSE Linux and probably also for RedHat. Just enter (as root)
rpm -iRPM-file-name
That's it.
(Actually you can compile the sources on Windows, too (of course), but since most people who do compile are Linux users, I dare to put it in the Linux section.)
PP3 is written in CWEB. This is special form of C++ and can be transformed to real C++ trivially. You only need the CWEB programs installed. For your convenience the C++ code of PP3 is included into the source distribution, so you need CWEB only if you want to modify the program.
There is no configure script. Just call make and (as
root) make install. Before that, you may want to adjust some
paths in the Makefile.
PP3 looks for its data files (all files with the .dat
extension) in a special directory that is pre-compiled in the
executable. The Makefile assures that this is the correct one, but you
can override that at runtime with the environment variable
PP3DATA.
There is exactly one object that can need a lot of memory: the Milky
Way. Therefore it's switched off by default. But if you want to see
the Milky Way on your maps, you probably should set the main memory size
of your TeX distribution to its maximal value. This is very
implementation specific. With teTeX (Linux) you have to find the
file texmf.cnf and set `main_memory.latex' to 7500000.
Then call (as root)
fmtutil --byfmt latex
With fpTeX/TeXLive (Windows) it's the same.
MikTeX however (Windows too) is different. Look for a directory
called localtexmf. Then create the file3
localtexmf\miktex\config\miktex.ini and write
mem_max=7500000
in it.
Alternatively (albeit not cleanly), look for an existing file called
miktex.ini and change the line with mem_max to the above.
These are the most common TeX variants. For others please have a look in the manual of your TeX distribution for definitive information.
The following is a mere crash course. It is supposed to enable you to use PP3 even if you didn't know how astronomers describe the sky.
Readers competent in astronomy may skip it, although Constellations and Catalogues contain minor program peculiarities, too.
On a sheet of paper, every point has an x and a y coordinate. On planet Earth, every location has a longitude and a latitude.
With a very similar system astronomers give the coordinates of every point in the sky. The sky longitude is called rectascension and the sky latitude is called declination. There is a sky North Pole (near the Polar Star), a sky South Pole, and a sky equator. You can make globes of the sky like of the Earth, with the only difference that you must imagine being inside the globe.
So, in a way, the rectascension is the x coordinate. It is given in `hours' (h) from 0h to 24h. Since the sky is circular, both 0h and 24h are the same rectascension, and 12h is the opposite to it.
Usually the fraction of the rectascension that is smaller than 1h is given in minutes and seconds, however in PP3 the rectascension is one decimal fraction number.
The declination corresponds to the y coordinate. It is measured from -90^\circ (South Pole) over 0^\circ (equator) to +90^\circ (North Pole).
Theoretically you could measure the brightness of stars in candela like the brightness of a light bulb. But this is rather awkward. Instead, astronomers use the system of magnitudes (m).
The brighter a star, the smaller is its magnitude. Sirius is the brightest star in the sky, and its brightness is -1.6m. Vega has a brightness of 0.0m, and Polaris, the Pole Star, of 2.0m. The faintest stars that you can see with the naked eye in a very clear sky have 6m.
The faintest stars in the standard catalogue of PP3 are of approx. 7m, however extremely good terrestrial telescopes can see up to 22m.
Since the 1930s, the sky is officially divided into 88 constellations. At that time, the boundaries between the constellations were clearly defined, too: namely by the coordinates of sky points that, when connected with their respective neighbours, create the boundaries.
Every constellation has a Latin name and a three letter abbreviation.
For example “Orion – Ori”, or “Ursa Major – UMa” (Great Bear), or
“Hydrus – Hyi” (Male Water Snake). This abbreviation plays a big
role in PP3 because it's the only way to denote a constellation.
You must use only uppercase letters in the abbreviation: ORI,
UMA, HYI.
One constellation, the snake or “Serpens”, is divided into two parts,
“Serpens Caput” (Head) and “Serpens Cauda” (Tail). They are
abbreviated SER1 and SER2 in PP3. If you say
SER only, you mean both parts.
When you use PP3 you have to tell the program e.g. which star you want to delete from the map or which nebula shall get a different label. For this, every sky object must have a distinct name in PP3.
By and large there are two kinds of objects in the sky: stars and nebulae. Astronomers have created many catalogues of them. There are two star catalogues and three nebulae catalogues supported in PP3.
The two star catalogues are the Flamsteed and the Henry Draper (HD) numbers. Flamsteed gave numbers beginning with `1' to stars in each constellation. The Flamsteed catalogue is small and doesn't contain the complete southern sky. In contrast to that, the HD catalogue doesn't distinguish between constellations, it covers the whole sky, and also contains faint stars. However the HD names are harder to read.
For example Rigel, \beta Ori, can be identified in PP3 with either
ORI 19
where `ORI' is Rigel's constellation (Orion) and `19' the
Flamsteed number; or with
HD 34085
where `34085' is Rigel's Henry Draper catalogue number. Both are
totally equivalent. The free program
Celestia is very useful
for finding Flamsteed or HD numbers.
The two nebula catalogues NGC and IC are
complementary, i.e. they don't have4
any nebulae in common. For example, the North America Nebula is called
`NGC 7000' and the Orion Nebula is 'NGC 1976'. The
IC catalogue usually contains fainter objects.
Parallel to that there is the much older and much smaller Messier
catalogue, abbreviated `M'. For example, the Orion Nebula can also
be called 'M 42', whereas the North America Nebula isn't included
in Messier's catalogue.
Pay attention to
Invoking PP3 is very straightforward. Since it is a command line program you only have to call it somehow and give a so-called input script as the parameter, see Input scripts. For example, entering
pp3 orion.pp3
on the command line starts PP3 and lets it generate the file
orion.pdf, which is a PDF file with a star map of
Orion. You can view this PDF with Acrobat Viewer, convert it
to a bitmap, or you can embed it into a text of yours.
Actually there are three possible output formats. By default, PP3 generates a LaTeX file in the current directory. But most people cannot do much with it, therefore certain commands in the input script trigger EPS or PDF output, see Output control.
PP3 can't generate bitmaps. If you need bitmaps you must use an appropriate program (e.g. GSView or the Gimp) for converting the vector data to bitmaps.
Especially on Unix it is very common to read from standard input and to
write to standard output. I don't think that this is sensible for
PP3, but anyway, I included this facility. If you give
`-' as the only parameter, PP3 reads the input script from
standard input, and if you don't give an output filename in the input
script (see Input scripts), PP3 writes to standard output.
Input scripts are the most important part of PP3, at least for the user. They contain some sort of wishlist about the map that you want PP3 to create.
The minimal PP3 input script is – well – the empty file. Then
PP3's default values create a dark blue star map of Orion:
You can override these defaults step by step. Let's do so: Write
     # Cygnus, the Swan

     filename output swan.tex
     switch pdf_output on

     set center_rectascension  19.95
     set center_declination    40.8
to the file swan.pp3 and call
pp3 swan.pp3
The result of these only four lines of input is a file swan.pdf
in the current directory with a star map of the Swan.
The lines of swan.pp3 are not difficult to explain: The very
first line is a comment. Everything that starts with a # is a
comment. You can write descriptive text in them to make the file more
readable.
The line
filename output swan.tex
makes PP3 write the generated map to the file swan.tex.
But such a file is rarely the desired output. Therefore the next line
switch pdf_output on
tells PP3 that we want to have a PDF file. So PP3 does everything necessary for that. And finally,
     set center_rectascension  19.95
     set center_declination    40.8
denotes the area of the sky that we want to be displayed. Both values indicate the celestial point that we want to have in the centre of the map. In this case, 19.95h rectascension and +40.8^\circ declination which is the centre of the constellation Swan. See List of all constellations, for a complete list of all constellations, along with their coordinates and more.
Let's continue with our Swan example of the previous section.
Normally the Milky Way is switched off, because it consumes a lot of memory, see Increase TeX's memory. However it looks rather nice, so let's switch it on:
switch milky_way on
Maybe you want to use the map in a book that is supposed to be printed in black and white. Then the current colour scheme is disadvantageous. The following lines redefine it:
     color nebulae                 0    0    0
     color background              1    1    1
     color grid                    0.5  0.5  0.5
     color ecliptic                0.3  0.3  0.3
     color constellation_lines     0.7  0.7  0.7
     color labels                  0    0    0
     color boundaries              0.8  0.8  0.8
     color highlighted_boundaries  0    0    0
     color milky_way               0.5  0.5  0.5
Colours are given as red–green–blue values, for further information see Colours. With these redefinitions, all elements on the map are printed either in black or in shades of grey.
A special problem are stars. With
color stars 0 0 0
stars are printed in black colour, one could think. But this is not
always true. By default, stars get their `real' colour according to
their B-V brightness. For example, Saiph in Orion is a little
bit blue, while Antares in Scorpius is known to be red. Therefore
PP3 ignores any `color' directive for stars, unless you
also say
switch colored_stars off
Last but not least you should change the highlighted constellation. By default, it's Orion. But we want to highlight the Swan, so we say
set constellation CYG
because “Cyg” is the astronomical abbreviation of the Swan (“Cygnus” in Latin). Highlighting means that its borderline gets another colour.
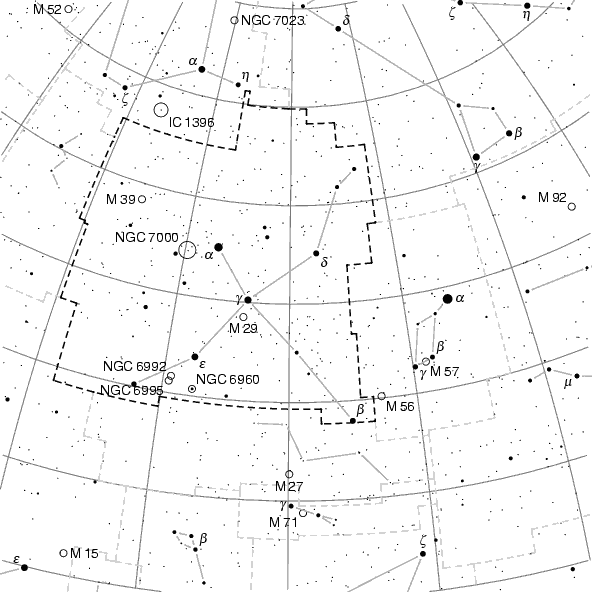
This is the map that results from all this (I removed the Milky Way from
this figure in order to keep the PDF manual small):
When you include a map in a text of yours, usually you can scale the graphics to fit your needs. The exact procedure depends on the program you use of course. Such additional scaling is helpful, but actually it should be superfluous since PP3 can deliver the map with the desired size.
The parameters
     set box_width 10
     set box_height 5
set the width of the map to 15cm and the height to 10cm. (By the way, all dimensions are given in centimetres in PP3.) The only thing that's still missing is the scale of the map. It is set with
set grad_per_cm 6
which sets it to 6 degrees per centimetre. With the current projection method5, the given scale is only exactly true for the centre of the map. Towards the rim there is a slight magnification (and distortion).
Every PP3 file can contain parameters and commands. So far, we've had parameters only. Both types of keywords must be neatly separated in the input script. First come the parameters, then the special keyword
objects_and_labels
and then the commands. The purpose of the commands is adding and deleting objects and their labels, to reposition the labels, and to add arbitrary text on the map. You can also change the contents of automatically generated labels.
My personal experience is that the most difficult part of writing input scripts is to fiddle about with labels. Although PP3 does most of the labelling work on its own, it is not perfect (yet). Thus you will value the features described in this section.
Please note how the texts themselves must be given: Either they don't
contain any spaces or line breaks. Then you can just enter them. But
if they do contain such white space, you must enclose them with
quotes "...". For example, you say
set_label_text HD 128620 Toliman
but
set_label_text HD 128620 "Rigil Kent"
If you (must) use quotes, and only then, you have to enter two symbols
in a special way, namely the backslash \ and the
quotes ":
set_label_text HD 128620 "\\footnotesize Toliman"
prints Toliman with small letters, see LaTeX in labels.
Quotes must be entered as \".
I change the label for Deneb, the alpha star in the Swan. At the moment, its label is a simple `\alpha'. But Deneb has a real name, and with
set_label_text CYG 50 Deneb
I change the label text to “Deneb”. This `CYG 50' is the
astronomical name for Deneb, see Denoting stars.
You can use that also for changing the label for a nebula:
set_label_text NGC 7000 "N. America Neb."
As said, please note that you have to enclose the label text in quotation marks if it contains spaces.
Now we get (only the changed part printed):

PP3 takes star names from a file. PP3's standard file
contains only the astronomical symbols for the stars (Bayer's Greek
letters and Flamsteed numbers), so if you want to have real star names,
you must use `set_text_label' as above. Or you use another star
data file with PP3, see Stars data file.
PP3 decides which labels are printed on the map by itself. But, of course, you can configure this behaviour, and you can delete or add any label.
For example, the command
delete_labels NGC 884 NGC 869 TAU 27 ;
deletes the labels for the nebulae NGC884 and NGC869, and for the star 27Tau from the map. The nebulae and the star themselves remain on it of course. Correspondingly,
add_labels CNC 65 CNC 47 CNC 43 CNC 48 ;
adds the currently set labels texts for the stars 65, 47, 43, and 48Cnc. All of them are too faint to get their labels implicitly.
But you can also influence labels globally in the parameters section of the input script. If you don't want to have any labels at all, simply say
switch labels off
in the parameters section. Another parameter keyword is
set faintest_star_with_label_magnitude 2.0
which means that only stars of brightness of at least 2.0m get an implicit (automatic) label.
If you think that PP3 mispositioned a label you can change that
with `reposition':
reposition M 39 S ;
This puts the label for the nebula M39 below the nebula.
`S' means `south'. The following table shows all possible
values, however you know it by and large from the windrose probably:
E
NE
N
NW
W
SW
S
SE
(See The keyword `towards', for a figure visualising these
abbreviations. But be careful since this figure is actually intended
for the towards keyword.)
Using `reposition' is also necessary if PP3 has suppressed
a label because it hadn't found a good place for it.
`reposition' forces a label to be printed.
Changing existing labels is a nice thing to do, however sometimes you
want to add arbitrary text on the map, e.g. `Pleiades' or `Virgo
galaxy cluster'. For all user defined text there is the keyword
`text'. For example,
     text "Virgo galaxy cluster" at 12.7 10
       color 0.0 0.0 0.9333 towards SE ;
This places the text `Virgo galaxy cluster' at the celestial coordinates 12.7h rectascension and +10^\circ declination in blue colour. See Colours, for how to denote colours in PP3.
towards'In a text label, after the keyword towards, you can say in which
direction, seen from the celestial coordinates given after the at
keyword, the label should be printed. The following figure illustrates
the ten possible values after towards:
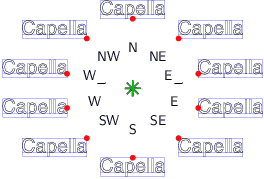
The red point marks the spot that lies exactly on the celestial
coordinates given after the `at' keyword.
The default value for towards is NE, so if you don't use
towards, PP3 places the text label to the upper right. In
particular, PP3 does not perform any algorithm for finding the
best position for the label as it does with automatically generated
labels.
For some nice tricks with text lables and towards, see LaTeX in labels.
But the `text' keyword can do more. When you include the
keywords `along declination' the label becomes a flex.
This is printed along a declination circle as a curved text. It's
especially nice for constellation names. So let's try it out:
text "\\bfseries Swan" at 20.05 49.8 along declination towards SW ;
This `\\bfseries' tells the typesetter to print it in bold
face, see LaTeX in labels. The result is the following:

But `text' can do even more. With
     text "$#3$" at 0 20 along declination
                 tics rectascension 1 towards N ;
     text "$#5$" at 11 0 along declination
                 tics declination 10 towards S ;
you create automatic tic mark labels at the +20^\circ declination
circle and the 11h rectascension circle. See Tic mark labels,
for more information about these placeholders like #3.
Typically you will embed the placeholders in $...$, because this
tells the underlying TeX typesetting engine to typeset the number as
a formula. This makes it look nicer.
Sometimes you have to remove stars or nebulae from the map, especially
because they collide with other objects. If you've already read how to
change labels, this is very straightforward. You remove sky objects
with `delete' and add them with `add'. Both commands take
a list of objects that is ended with a semicolon ;:
     delete LEO 63  HD 97605 ;
     add NGC 6992 ;
The `add' command is useful mostly for nebulae, because by
default, PP3 only includes all objects of the Messier catalogue,
but only other objects with a minimal brightness, see Filtering by brightness.
It is a tricky task to place labels on a dotty star map without creating to many overlaps, and especially overlaps with other labels are very annoying. Therefore PP3 tries to avoid that.
It does so by using a penalty algorithm: It tests the eight windrose positions around the respective object, and calculates the resulting overlaps for each position. The overlaps are counted as penalties. The position with the smallest penalty value is chosen. In very bad cases when the penalties exceed a certain threshold, the label is not printed at all.
All of this can be overruled by the user, but normally the standard behaviour is good enough. So read this section only if you are really keen to know how it works.
PP3 calculates overlaps with all objects on the map: stars,
nebulae, constellation lines, boundary lines, and – last but not least
– other labels. All overlaps are weighted, and their sum is the
penalty value. You can influence the weighting. By default, it's
1000 for all objects. But with
penalties stars 2000
you double the significance of stars. Thus you make overlaps of labels with stars less probable. In contrast,
penalties boundaries 0
tells PP3 that printing a label on a boundary line isn't bad at all.6
Each label has a core area, which is the text area itself, and a
rim, which is an area around the text area. Both are rectangles,
separated by a skip that is the same as the one that separates
labels and their respective celestial object, see Other layout parameters.
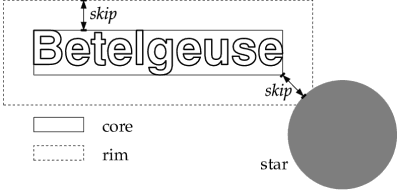
PP3 takes both rim and core into account. The relative significance of the rim can be set with e.g.
penalties rim 2000
which doubles the default value of 1000. With
penalties rim 0
the rim loses its effect completely. Notice that PP3 adds rim penalties also for the whole core area, so that the core is always more significant than the rim, no matter how you set the penalty values.
What's the point in the rim? The core avoids overlaps, but the rim is supposed to make approximations of labels with other things on the map less probable.
You may have noticed that the rim overlaps with the object (star or nebula) itself. Usually this only adds some sort of bias to the penalty values of the diagonal positions, but this direct contact is particularly useful for double stars: There both components get “their” label on “their” side due to the small rim overlaps with the respectively other component.
“Line objects” means constellation lines and boundary lines. PP3 treats both of them in a special way: When they collide with the rim of a label, it's less bad than for non-line objects. The reason is that lines are so different from labels visually, that it's not fatal if they are rather close together.
The two new penalties that are used for the rim are
constellation_lines_rim and boundaries_rim. Their default
value is 1000 as usual. For example, with
penalties boundaries_rim 0
you tell PP3 that a label directly next to a boundary line is totally okay for you.
Sometimes a certain region of the map is so much crowded with stars, nebulae, labels, and more, that there simply is no space left for yet another label. In this case the penalty value reaches a very high number. If it exceeds a given threshold, PP3 suppresses that label. You can still override this, see Reposition labels.
You can set this threshold with
penalties threshold 3000
Again, 1000 is the default value.
On PP3's project page you can download a neat reference card. If you fold it twice it is a handy zigzag.
The outline of a PP3 input script is:
     # Some introductory comments,
     # i.e. what the file is about to do.

     Section I: Parameters: Output format and global style.

     objects_and_labels

     Section II: Commands: Delete/add/modify objects and/or labels
All keyword here are parameters. This means that they are
allowed only in the first part of an input script, i.e.
before the objects_and_labels command (if there is one).
| set center_rectascension rectascension | Parameter |
| set center_declination declination | Parameter |
|
Set the rectascension and declination of the centre of the map to
rectascension (in hours) and declination (in degrees)
respectively.
Defaults: 5.8 (rectascension), 0.0 (declination) |
| set box_width width | Parameter |
| set box_height height | Parameter |
|
Set the width and height of the resulting map to width and
height (in centimetres) respectively.
Defaults: 15 (width), 15 (height) |
| set grad_per_cm scale | Parameter |
|
Set the scale of the resulting map to scale (in degrees per
centimetre).
Default: 4.0 |
| filename output filename | Parameter |
The resulting map will be written to the file filename in LaTeX
format. It must have the file extension .tex. If filename
is empty the map will be written to standard out.
Default: |
| switch eps_output on/off | Parameter |
|
If on, PP3 creates a PDF file. (Additionally to the
LaTeX and EPS files that you then can ignore.)
Default: off |
| switch pdf_output on/off | Parameter |
|
If on, PP3 creates an EPS file. (Additionally to the
LaTeX file that you then can ignore.)
Default: off |
| set constellation abbreviation | Parameter |
Highlight the constellation that is given by abbreviation (given
with all-uppercase letters). If you don't want to hightlight anything,
set it to "" or to an invalid abbreviation.
At the moment, highlighting means that the boundaries of the respective constellation get another colour, see Colours. Default: |
| switch milky_way on/off | Parameter |
| switch nebulae on/off | Parameter |
| switch grid on/off | Parameter |
| switch ecliptic on/off | Parameter |
| switch boundaries on/off | Parameter |
| switch constellation_lines on/off | Parameter |
| switch labels on/off | Parameter |
|
Print or don't print the respective (class of) object(s) on the map.
`Grid' means the coordinate grid, `boundaries' are the borderlines of
the constellations, and `constellation lines' denote the lines between
the brightest stars that are supposed to help to see the shape of a
constellation.
Defaults: off (Milky Way), on (all others) |
| switch colored_stars on/off | Parameter |
|
If switched on, all stars get a colour that represents their real colour
according to their spectral class. This may be unsuitable on a bright
background since most stars are pretty white.
If switched off, all stars get the colour given by ` Default: on |
| set faintest_cluster_magnitude magnitude | Parameter |
|
Don't print open star clusters that are fainter than magnitude.
Default: 4.0 |
| set faintest_diffuse_nebula_magnitude magnitude | Parameter |
|
Don't print nebulae that are fainter than magnitude. In this
case, `nebulae' is meant in the narrower sense, i.e. no stellar
clusters.
Default: 8.0 |
| set faintest_star_magnitude magnitude | Parameter |
|
Don't print stars that are fainter than magnitude.
Default: 7.0 |
| set faintest_star_with_label_magnitude magnitude | Parameter |
|
Only stars that have a brightness of at least magnitude get an
automatically generated label.
Default: 3.7 |
| set faintest_star_disk_magnitude magnitude | Parameter |
|
Only stars that have a brightness of at least magnitude will be
printed as more than just dots.
Default: 4.5 |
| set minimal_star_radius radius | Parameter |
|
Set the radius (in centimetres) of the dots that are used for the
faintest stars.
Default: 0.015 |
In PP3, colours are given by their red–green–blue values (also
called the RGB colour scheme). Every value is between 0
and 1. For example, `1 0 0' is red, `0 0 1' is blue,
`0 0 0' is black and `1 1 1' is white.
For shades of grey all three values must be the same. So a medium grey
is `0.5 0.5 0.5'. For further examples have a look at the
following default values.
| color background red green blue | Parameter |
|
Set the background colour of the map to the given colour.
Default: 0 0 0.4 (dark blue) |
| color grid red green blue | Parameter |
|
Set the coordinate grid colour to the given colour.
Default: 0 0.298 0.447 (dark blue-grey) |
| color ecliptic red green blue | Parameter |
|
Set the ecliptic line colour to the given colour.
Default: 1 0 0 (red) |
| color boundaries red green blue | Parameter |
|
Set the ordinary constellation boundaries colour to the given colour.
Default: 0.5 0.5 0 (dark yellow) |
| color highlighted_boundaries red green blue | Parameter |
|
Set the highlighted constellation boundaries colour to the given colour.
See Highlighted constellation.
Default: 1 1 0 (yellow) |
| color constellation_lines red green blue | Parameter |
|
Set the constellation lines colour to the given colour.
Default: 0 1 0 (green) |
| color milky_way red green blue | Parameter |
|
The Milky Way is printed in shades of different colour, representing its
brightness. The darkest areas of the Milky Way get the background
colour, and the brightest the colour that you give here.
The Milky way must be switched on of course in order to savour it, which is not the case by default, see Switching things on or off. Default: 0 0 1 (blue) |
| color nebulae red green blue | Parameter |
|
Set the colour of the nebulae circles to the given colour.
Default: 1 1 1 (white) |
| color stars red green blue | Parameter |
Set the colour of all stars to the given colour. Please note that this
only has effect if the switch `colored_stars' is off, see
Switching things on or off.
Default: 1 1 1 (white) |
| color labels red green blue | Parameter |
|
Set the colour of automatically generated labels to the given colour.
Default: 0 1 1 (cyan) |
| color text_labels red green blue | Parameter |
|
Set the colour of user defined labels to the given colour.
Default: 1 1 0 (yellow) |
| line_style grid style | Parameter |
| line_style ecliptic style | Parameter |
| line_style boundaries style | Parameter |
| line_style highlighted_boundaries style | Parameter |
| line_style nebulae style | Parameter |
| line_style constellation_lines style | Parameter |
Set the line style of the respective object to style. Possible
values are none, solid, dashed, and dotted.
Defaults: solid (grid, nebulae, constellation lines), dashed (ecliptic, boundaries) |
| line_width grid width | Parameter |
| line_width ecliptic width | Parameter |
| line_width nebulae width | Parameter |
| line_width boundaries width | Parameter |
| line_width highlighted_boundaries width | Parameter |
| line_width constellation_lines width | Parameter |
|
Set the line width of the respective object to width (in
centimetres).
Defaults: 0.025 (grid), 0.018 (ecliptic, nebulae), 0.035 (boundaries, constellation lines) |
| set shortest_constellation_line length | Parameter |
|
Set the length of the shortest constellation line that is printed to
length (in centimetres). All constellation lines shorter than
length are suppressed.
Default: 0.1 |
| set label_skip length | Parameter |
|
Set the distance between the outer rim of the celestial object and its
label to length (in centimetres).
Default: 0.06 |
| set minimal_nebula_radius radius | Parameter |
|
All nebulae that would be smaller than radius centimetres are
printed with a radius of exactly radiuscm.
Default: 0.1 |
| set star_scaling factor | Parameter |
|
Make all star circles factor times bigger than normal.
Default: 1 |
| set fontsize size | Parameter |
|
Set the default font size to sizept. size may be 10,
11, or 12.
Default: 10 |
| filename include filename | Parameter |
|
If non-empty, the file filename is interpreted as a PP3
input script and read before the keywords in the current script are
interpreted. This enables you to enforce global style parameters and
other commands for all maps in a set of maps. The included script must
not include yet another file.
Please note that PP3 looks for the included file in the current directory, and not in the directory where the main input script is. Default: |
| filename latex_preamble filename | Parameter |
|
If non-empty, the contents of the file filename is included at an
appropriate position in the resulting LaTeX file. This enables you
to use arbitrary LaTeX macros to customise the map, see LaTeX preamble.
Default: |
| penalties stars penalties | Parameter |
| penalties labels penalties | Parameter |
| penalties nebulae penalties | Parameter |
| penalties boundaries penalties | Parameter |
| penalties constellation_lines penalties | Parameter |
|
Set the penalties for an overlap of a label with the respective object
to penalties.
Defaults: 1000 (all) |
| penalties rim penalties | Parameter |
|
Set the significance of an overlap with the label's rim relatively to
the label's core to penalties.
Note that the rim can never become more significant than the core, because the rim penalties add to the core penalties while calculating the core. Default: 1000 |
| penalties boundaries_rim penalties | Parameter |
| penalties constellation_lines_rim penalties | Parameter |
|
Set the penalties for an overlap of the label's rim with the respective
object to penalties.
These two objects get their own rim penalties because approximation of a label with a line object is not so bad usually. Defaults: 1000 (all) |
| penalties threshold penalties | Parameter |
|
If the penalties for a label exceed penalties, the label is
suppressed.
Default: 1000 |
| filename stars filename | Parameter |
| filename nebulae filename | Parameter |
| filename label_dimensions filename | Parameter |
| filename constellation_lines filename | Parameter |
| filename boundaries filename | Parameter |
| filename milky_way filename | Parameter |
|
This lets PP3 look for the respective data in the given file.
The filenames must be full paths from the current directory.
Defaults: |
All keyword here are commands.
| objects_and_labels | Command |
|
This keyword splits the input script in two parts. The first part must
contain parameters only, whereas the second contains
commands only.
This keyword must occur either once or never in a PP3 input script. If never, the whole script consists of parameters. |
add objects ... ;
|
Command |
| Add the objects to the map, even if PP3's implicit behaviour would have excluded them. This is sensible for nebulae mostly. |
delete objects ... ;
|
Command |
add_labels objects ... ;
|
Command |
delete_labels objects ... ;
|
Command |
reposition object towards direction ;
|
Command |
set_label_text object "label-text"
|
Command |
text label-text at rectascension declination [color red green blue] [towards direction] ;
|
Command |
All user defines texts on the map are generated with the keyword
`text'. However there are two sub-variants, namely flexes
and tic mark labels. Note that they can have the color
and towards keywords as well.
text label-text at rectascension declination along declination ;
|
Command |
| Create a flex label at the given coordinates. A flex label follows the respective declination circle. |
For further options see Arbitrary text.
text label-text at rectascension declination tics (rectascension | declination) step ;
|
Command |
With the keyword rectascension, one rectascension circle gets tic
marks, analogously with declination. The celestial position
after `at' denotes the starting point of the labelling, and
step is the step skip (in hours or degrees respectively) for the
subsequent tic mark labels.
The label should contain one of the following special expressions:
#1
#2
#3
#4
#5
For further options see Arbitrary text. Tic mark labels can also be flexes, see Flexes.
We're entering now the phase of sophistication. Here you learn how to customise the graphical appearance of all text on your sky map almost arbitrarily. You also learn how to achieve special text effects using the LaTeX language.
I can't explain LaTeX itself though. So I must assume that you've been taught the basics elsewhere. On the other hand, the LaTeX snippets that I will give in this chapter may be enough for many purposes.
It is not necessary to use the features described here, so it's still true that you needn't know about LaTeX in order to use PP3. However if you want to have full control, LaTeX competence is unavoidable.
You can use all LaTeX macros in PP3 labels that are allowed in
horizontal boxes (like \mbox{...}). Additionally, you can use
many commands from the PSTricks package.
The most important pitfall is the backslash \, because when
using quotes as string delimiters, you have to write is as `\\'.
Let's have a look at a more complex example:
     text "\\small Wolf 359\\hskip0.3em
           \\psdots[dotstyle=+,dotangle=45](0,0)"
          at 10.902 7.32 color 0.3 0.3 0.9333 towards W_ ;
This prints an `x' at the position of the star
Wolf 359 and prints the label `Wolf 359' at the top left next
to it:

The row of LaTeX macros consists of the following elements:
\small
\small' there, too.
\hskip0.3em
\psdots[dotstyle=+,dotangle=45](0,0)
dotstyle=+' option
makes it a `+', and the `dotangle=45' option turns it
by 45 degree, which makes it an `x' effectively.
The clever bit is the fact that this macro is the very last one in the
row. Since it says `towards W_' (towards left, on baseline) in
the PP3 command, this means that the `x' lies
exactly on the celestial coordinates given after the `at'
option.
Providing a LaTeX preamble is the most elegant, mighty, but also – if you know LaTeX – the easiest way to adjust the map layout according to your taste and needs. There is a default preamble that defines the standard map layout. This you can override in a user preamble as much as you want.
By default, the LaTeX document that PP3 creates begins with
     01   \documentclass[10pt]{article}
     02
     03   \nofiles\usepackage[dvips]{color}
     04   \usepackage{pstricks,pst-text}
     05   \newcommand*{\DP}{.}
     06   \newcommand*{\TicMark}[1]{#1}
     07   \newcommand*{\Label}[1]{#1}
     08   \newcommand*{\TextLabel}[1]{#1}
     09   \newcommand*{\FlexLabel}[1]{#1}
     10   \newcommand*{\Starname}[1]{#1}
     11   \newcommand*{\Messier}[1]{M\,#1}
     12   \newcommand*{\NGC}[1]{NGC\,#1}
     13   \newcommand*{\IC}[1]{IC\,#1}
     14
     15   \usepackage{mathptmx}
     16   \usepackage{helvet}
     17   \AtBeginDocument{\sffamily}
     18
     19   [optional input of user provided file]
The above is not provided by you, it is the LaTeX code that PP3 generates every time. If you don't look at its LaTeX output file, you never see it. But it may be helpful to know what happens here, so let's skim through it line by line:
10pt in the first line defines the standard font size in
points. You can change that with the input script parameter
set fontsize 12
which changes it to 12pt. Possible values are 10,
11, and 12.
You tell PP3 where your own preamble is with the filename
parameter `latex_preamble' in the input script, for example:
filename latex_preamble mypreamble.tex
The file mypreamble.tex contains your LaTeX preamble macros
and must reside in the current directory, or in another directory where
TeX looks for its files.
The following is the contents of the file wiki.tex of the
PP3 distribution. It is the original user LaTeX preamble that
was used for the Wikipedia Project, see Successful use of PP3.
     01   \usepackage{amsmath}
     02   \usepackage[T1]{fontenc}
     03   \IfFileExists{eulervm.sty}{\usepackage{eulervm}}{}
     04   \usepackage{relsize}
     05   \IfFileExists{t1pmy.fd}{
     06     \renewcommand*{\sfdefault}{pmy}
     07   }{
     08     \renewcommand*{\sfdefault}{phv}
     09   }
     10   \renewcommand{\Messier}[1]{\footnotesize{\scriptsize M}\,#1}
     11   \renewcommand{\NGC}[1]{\footnotesize{\scriptsize NGC}\,#1}
     12   \renewcommand{\IC}[1]{\footnotesize{\scriptsize IC}\,#1}
     13   \renewcommand{\FlexLabel}[1]{{\bfseries #1}}
     14   \renewcommand{\TicMark}[1]{{\mdseries\scriptsize\mathversion{normal} #1}}
     15   \AtBeginDocument{\sffamily\boldmath}
And this is what it does:
\IfFileExists thing tests whether the package is available on the
current computer. The package is included only if it exists.
\smaller which can be very useful in text
labels. It reduces the current font size. For example I can say
set_label_text LEO 32 "\\smaller Regulus"
\sffamily and
to bold Greek letters with \boldmath.
First of all – what is a hook? A hook in general is a macro or command that can be re-defined by the user, and that is called implicitly. Thus, by re-defining a hook, the user can modify the behaviour of the program at certain points.
In PP3, hooks are called for printing text of various kinds. For
example, every implicit (i.e. automatically generated) star name
is printed by \Starname as in \Starname{$\gamma$}. By
default, this macro does nothing more than printing its argument:
\newcommand*{\Starname}[1]{#1}
But if you re-define it, you can make every (implicit!) star label a little bit larger:
\renewcommand*{\Starname}[1]{\larger #1}
Notice that the macro \larger is provided by the `relsize'
package that must be loaded before, see User preamble. So, just
write the lines
     \usepackage{relsize}
     \renewcommand*{\Starname}[1]{\larger #1}
in the file mypreamble.tex, say
set latex_preamble mypreamble.tex
in the PP3 input script, and voilà – all star labels are
larger.
PP3 knows nine hard-wired LaTeX hooks:
\Label
\TextLabel
text.
\FlexLabel
\Starname
set_label_text.
\Messier
\NGC
\IC
\renewcommand*{\NGC}[1]{#1}
\TicMark
\DP
\renewcommand{\DP}{,}
The following issues are known to the maintainer of PP3. If you find another one, please report it on PP3's project page.
lines.dat) result in an error message, which is good, but the
error message may include another – probably valid – star name, which
is bad. Fortunately the actually wrong star and the printed star are
within the same constellation line, the printed star coming first.
reposition' needs one, but a
`set_label_text' not.
It would be nice to have the following things in PP3. Please contact Torsten Bronger if you want to contribute.
faintest_star_disk_magnitude, should be removed from the map
automatically, if they overlap with a label. It shouldn't matter
whether the label was implicitly created or user-defined.
Besides that, I'd like to re-structure the internals of PP3 because in some respect the code is not well maintainable and expandable. For the long-term future it may be worth thinking about using Guile as the scripting language.
Maybe you want to use your own data bases with PP3. If they are not too large7 you may well do so. Of course, then you need to know the internal structure of the files. Although they are so simple that reverse engineering should be almost trivial, you find here a complete description of all of them.
Additionally I will give information where the original data of PP3's standard distribution came from.
The last point, the “label dimensions file”, isn't a real data base file, but an internal temporary file. It is mentioned here just for completeness.
This is a text file usually called stars.dat. Four consecutive
lines belong together and refer to one particular star. There is no
header.
0' if unknown),
0' if unknown),
99.0' if unknown), and
0' if unknown).
$\alpha$”, “$\phi^{2}$”, or simply
“$23$”. May be the empty string.
F5III”. Anything may follow as in
“K2-IIICa-1”, however the mandatory parts must not contain any
whitespace.
     358 15 0.139805 29.0906 2.06 -0.11 21
     $\alpha$
     AND
     B8IVpMnHg
     11636 553 1.91067 20.8081 2.64 0.13 6
     $\beta$
     ARI
     A5V
     886 39 0.220611 15.1836 2.83 -0.23 88
     $\gamma$
     PEG
     B2IV
It's the Bright Stars Catalogue (BSC) as distributed with the program Cartes du Ciel. It contains almost 10,000 stars. I corrected minor mistakes and let all double stars collapse, i.e. their visual brightnesses were summed up and the respective minor partner was removed from the file.
This is a text file usually called nebulae.dat. There is no
header. The file is just a whitespace separated stream of numbers and
constellation abbreviations. In order to make it more readable though,
the standard PP3 nebulae file has every nebula on one single line
of its own.
Each dataset has the following eleven fields:
0' if not listed there),
0' if not listed there),
0' if not listed there),
720.0' if
unknown), and
     1 0 0 PEG 0.121083 27.7089 13.6 0.0283333 0.02 -30 1
     2 0 0 PEG 0.121417 27.6786 15 0.0166667 0.01 -22 1
     3 0 0 PSC 0.121333 8.30139 14.4 0.0183333 0.01 -21 1
     4 0 0 PSC 0.123472 8.37389 16.9 0.01 0.005 55 1
     5 0 0 AND 0.130222 35.3628 14.8 0.02 0.0116667 -25 1
     6 0 0 AND 0.159056 33.3089 14.1 0.0283333 0.0266667 -50 1

     1976 0 42 ORI 5.58808 -5.39028 4 1.08333 1 720 2
     3034 0 82 UMA 9.93167 69.6831 9.2 0.186667 0.0716667 25 1
     7000 0 0 CYG 20.9806 44.5167 4 2 1.66667 720 2
It's the NGC/IC catalogues as compiled by Wolfgang Steinicke.
This is a text file usually called lines.dat. It has no header.
You can define paths of constellation lines by lists of stars that are
ended with a semicolon `;'. You can insert superfluous
whitespace as you wish, and comments after every `#'.
Stars are given in the usual way: Either by a pair of constellation abbreviation and Flamsteed number, as in
ORI 19
(Rigel), or by `HD' and the Henry Draper catalogue number, as in
HD 108248
(Acrux).
     # Orion

     ORI 19  ORI 34  ORI 24 ;
     ORI 53  ORI 50  ORI 46  ORI 34 ;
     ORI 50  ORI 58 ;

     # Southern Cross

     HD 111123  # beta Cru
     HD 106490 ; # delta Cru

     HD 108248  # alpha Cur
     HD 108903 ;  # gamma Cru
I created the lines after my fancy. The Atlas für Himmelsbeobachter8 was an important source of inspiration though.
It doesn't make much sense to use an own boundaries file, unless you
want to use a different equinox, but anyway. This is a text file
usually called boundaries.dat. It has no header.
The file is a sequence of elementary line segments. Every segment is a whitespace separated sequence of entries. The entries for each segment are:
SER1 and
SER2 for Serpens Caput and Serpens Cauda.
     3 20.63865 2.43608 20.63929 1.43613 20.63992 0.43617 2 AQL AQR
     10 20.63992 0.43617 20.64055 -0.56377 20.64118 -1.56373
       20.64181 -2.56368 20.64245 -3.56364 20.64308 -4.56359 20.64372 -5.56355
       20.64435 -6.56350 20.64500 -7.56346 20.64564 -8.56341 2 AQL AQR
     9 17.71838 -67.57110 17.65152 -67.58319 17.58465 -67.59526
       17.51772 -67.60731 17.45076 -67.61933 17.38378 -67.63130 17.31676 -67.64324
       17.24970 -67.65515 17.21616 -67.66108 2 ARA APS
It's the Catalogue of Constellation Boundary Data by Davenhall and Leggett. I had to fix some bugs though, because the Ophiuchus/Serpens region was flawed. Additionally, the original data has peculiarities because it tries to be useful for bounded maps, e.g. in Mercator projection. I removed the resulting spurious lines.
This is a text file usually called milkyway.dat.
Its header is extremely simple: It consists of only one number which is the maximal (= equatorial) diagonal half distance of two pixels in degrees. This value is used as the radius for the milky way pixels. Of course it must be the minimal radius for which there are no gaps between the pixels.
What follows are the Milky Way pixels themselves. Each consists of tree entries, separated by white space:
     0.212
     11.885 0.259 1
     11.962 0.295 5
     11.974 0.298 5

     17.982 -26.999 136
     17.982 -27.299 158
     17.982 -27.599 169
     17.982 -27.899 199
     17.981 -28.199 235
I used the All-Sky Milky Way Panorama by Axel Mellinger. His bitmap with the two hemispheres in equidistant azimuthal projection was greyscaled and smoothed with the Gimp, and then transformed to PP3's format with a small hand-written C program.
The default name of this file is labeldimens.dat. This file is
never user provided but generated by PP3 itself in order to store
typographic dimensions of all labels. Highly probably you needn't know
its structure.
Every labels has two lines in the file:
     $10$~\footnotesize UMa
     0.97106 0.23043 0.00253
     $\omega$
     0.34197 0.17081 0.00000
     10 UMa
     1.11657 0.23389 0.00316
     47 Tuc
     0.94506 0.23389 0.00316
     Pleiades
     1.20865 0.24777 0.00316
     \FlexLabel{Andromeda}
     1.86061 0.25076 0.00316
     \FlexLabel{Antlia}
     0.93945 0.25076 0.00316
set constellation
center_rectascension
center_declination
grad_per_cm
The values are taken from the input scripts used for the Wikipedia
Project, see Successful use of PP3.
| Latin | ab. | English | rec. | dec. | sc.
|
| Andromeda | And | Andromeda | 1 | +38 | 4
|
| Antlia | Ant | Air Pump | 10.2 | -35 | 3
|
| Apus | Aps | Bird of Paradise | 16 | -75 | 3
|
| Aquarius | Aqr | Water Carrier | 22.3 | -8 | 6
|
| Aquila | Aql | Eagle | 19.7 | +3 | 4
|
| Ara | Ara | Altar | 17.5 | -53 | 4
|
| Aries | Ari | Ram | 2.8 | +18.8 | 4
|
| Auriga | Aur | Charioteer | 5.6 | +38 | 4
|
| Boötes | Boo | Herdsman | 14.7 | +34 | 4
|
| Caelum | Cae | Chisel | 4.8 | -38 | 3
|
| Camelopardalis | Cam | Giraffe | 5.5 | +75 | 5
|
| Cancer | Cnc | Crab | 8.7 | +20 | 4
|
| Canes Venatici | CVn | Hunting Dogs | 13 | +40 | 4
|
| Canis Major | CMa | Big Dog | 6.5 | -20 | 4
|
| Canis Minor | CMi | Little Dog | 7.5 | +12 | 4
|
| Capricornus | Cap | Goat | 21 | -16 | 4
|
| Carina | Car | Keel | 8.5 | -64 | 5
|
| Cassiopeia | Cas | Cassiopeia | 0.5 | +60.5 | 4
|
| Centaurus | Cen | Centaur | 13.6 | -45 | 5
|
| Cepheus | Cep | Cepheus | 23 | +75 | 4
|
| Cetus | Cet | Whale | 1.7 | -7 | 6
|
| Chamaeleon | Cha | Chameleon | 11 | -79 | 4
|
| Circinus | Cir | Compasses | 14.8 | -62 | 4
|
| Columba | Col | Dove | 5.8 | -35 | 4
|
| Coma Berenices | Com | Berenice's Hair | 12.4 | +22.5 | 4
|
| Corona Australis | CrA | Southern Crown | 18.6 | -42 | 3
|
| Corona Borealis | CrB | Northern Crown | 15.8 | +33 | 4
|
| Corvus | Crv | Crow | 12.4 | -18 | 4
|
| Crater | Crt | Cup | 11.4 | -16 | 4
|
| Crux | Cru | Southern Cross | 13.2 | -60.8 | 4
|
| Cygnus | Cyg | Swan | 19.95 | +40.8 | 5
|
| Delphinus | Del | Dolphin | 20.5 | +12 | 3
|
| Dorado | Dor | Goldfish | 5.1 | -60 | 4
|
| Draco | Dra | Dragon | 16.5 | +72 | 5
|
| Equuleus | Equ | Little Horse | 21.2 | +8 | 3
|
| Eridanus | Eri | River | 3.8 | -30 | 6
|
| Fornax | For | Furnace | 2.7 | -32 | 4
|
| Gemini | Gem | Twins | 7 | +20 | 4
|
| Grus | Gru | Crane | 22.5 | -44 | 4
|
| Hercules | Her | Hercules | 17.55 | +30 | 5
|
| Horologium | Hor | Clock | 3.3 | -53 | 4
|
| Hydra | Hya | Hydra (Sea Serpent) | 11.15 | -15 | 10
|
| Hydrus | Hyi | Water Serpent (male) | 2.5 | -70 | 4
|
| Indus | Ind | Indian | 21.5 | -60 | 4
|
| Lacerta | Lac | Lizard | 22.5 | +46 | 4
|
| Leo | Leo | Lion | 10.8 | +20 | 4
|
| Leo Minor | LMi | Smaller Lion | 10.3 | +32 | 4
|
| Lepus | Lep | Hare | 5.6 | -18 | 4
|
| Libra | Lib | Balance | 15.2 | -17 | 4
|
| Lupus | Lup | Wolf | 15.3 | -41 | 4
|
| Lynx | Lyn | Lynx | 8.2 | +47 | 4
|
| Lyra | Lyr | Lyre | 18.8 | +37 | 3
|
| Mensa | Men | Table | 5.7 | -77 | 4
|
| Microscopium | Mic | Microscope | 21.15 | -37 | 3
|
| Monoceros | Mon | Unicorn | 6.7 | -3.5 | 4
|
| Musca | Mus | Fly | 12.6 | -70 | 4
|
| Norma | Nor | Square | 16 | -50 | 4
|
| Octans | Oct | Octant | 22 | -85 | 4
|
| Ophiucus | Oph | Serpent Holder | 17.3 | -9 | 6
|
| Orion | Ori | Orion | 5.8 | +0 | 4
|
| Pavo | Pav | Peacock | 19.5 | -67 | 4
|
| Pegasus | Peg | Winged Horse | 22.7 | +20 | 6
|
| Perseus | Per | Perseus | 3.6 | +47 | 4
|
| Phoenix | Phe | Phoenix | 0.7 | -49 | 5
|
| Pictor | Pic | Easel | 5.6 | -54 | 4
|
| Pisces | Psc | Fishes | 0.5 | +14 | 6
|
| Pisces Austrinus | PsA | Southern Fish | 22.3 | -31 | 4
|
| Puppis | Pup | Stern | 7.6 | -31 | 4
|
| Pyxis | Pyx | Compass | 8.95 | -30 | 4
|
| Reticulum | Ret | Reticle | 3.9 | -60 | 3
|
| Sagitta | Sge | Arrow | 19.6 | +15 | 4
|
| Sagittarius | Sgr | Archer | 18.5 | -27 | 4
|
| Scorpius | Sco | Scorpion | 16.8 | -30 | 4
|
| Sculptor | Scl | Sculptor | 0.5 | -32 | 5
|
| Scutum | Sct | Shield | 18.7 | -10 | 3
|
| Serpens | Ser | Serpent | 17.1 | +2 | 6.5
|
| Sextans | Sex | Sextant | 10.2 | -1 | 4
|
| Taurus | Tau | Bull | 4.6 | +18 | 4
|
| Telescopium | Tel | Telescope | 19.3 | -52 | 4
|
| Triangulum | Tri | Triangle | 2.2 | +33 | 4
|
| Triangulum Australe | TrA | Southern Triangle | 16 | -65 | 3
|
| Tucana | Tuc | Toucan | 23.7 | -67 | 4
|
| Ursa Major | UMa | Great Bear | 11.5 | +55 | 6
|
| Ursa Minor | UMi | Little Bear | 15 | +78 | 4
|
| Vela | Vel | Sails | 9.6 | -48 | 4
|
| Virgo | Vir | Virgin | 13 | +3 | 5
|
| Volans | Vol | Flying Fish | 7.8 | -70 | 4
|
| Vulpecula | Vul | Fox | 20.2 | +25 | 4
|
PATH: Installing PP3
PP3DATA: Building from sources, Installing PP3
[1] as long as we don't have SVG
[2] which is included into the distribution
[3] It may be necessary to create the sub directories, too.
[4] well, shouldn't have
[5] the equidistant azimuthal projection
[6] Avoid negative values, although PP3 doesn't reject them. They wouldn't make sense anyway.
[7] Unfortunately PP3 still has the disadvantageous behaviour of reading the whole data base file.
[8] by Erich Karkoschka, in German; ISBN 3440074889